
Tuesday, October 26, 2010
Monday, October 25, 2010


.jpg)
Friday, October 22, 2010


With all the briefing and explanation. This is the outcome of my editing by using Photoshop software. I may not create a masterpiece but now i'm currently learning. There are few of mistakes that i made or my style of editing is not very good. I hope to learn more and more about the usage and how to be more better on editing picture by using Photoshop software. I will continue on learning and improving time to time. Hopes for that i can make much better editing style. Thank You ^-^


What i did in this picture is editing the sky color. Why i'm doing this? it's because the original color of the sky is a bit blueish. So, in order to make the car driving at night. I did a little adjustment to the sky color by using brightness/contras option. Before i did the brightness, firstly i select the area that i want only to edit. It is done by using Lasso tool. Then select the only area that i want that is from this picture is the sky only, after that edit it by using brightness/contrast option.


What i did to this picture is i'm doing a blur effect to the color of light. The type of blur that i'm using is the radial blur. How i did this? it is actually very easy, first you select filter at the navigation bar up there. Then what you need to do is find the blur effect. After you have found the blur effect, select the radial blur then you customize how you want to blur it. Then click 'OK'.

What i do here is adjusting the levels of the rounded selection. By selecting the image at the navigation bar and select levels. I can easily adjust the darkness and brightness of the color inside of the filled rounded shape. I can adjust how the way i want it. By this picture i just do a minor adjust to the color so that it will blend in to the lamp.

As we can see here is the shape has already been filled with a color. How i do it? first i right-click on the rounded selection then i select the 'fill' option. Then i just pick the color that i want which from this picture is yellow. After that click 'OK'. The result is as what we can seen in the picture.

As what we can see in this picture is i already done to make a rounded selection to the car's lamp. The reason why i did this to make another effect on the car's lamp in order to make it a bit dark in the inside of the lamp. I want it to looks more real and as the light can be seen like it is really a real light that comes from the lamp.


As this picture present what i'm doing is creating a new layer of the same layer that makes the light effect to the car's lamp. The reason i'm doing it so because to make the light more darken so that i will kind a look real. I create this new layer by right-click on the layer that is the one that makes the yellow light, then i select duplicate layer. Then it will appear another new layer but as the same as the original layer. By doing so, it will make the lighting effect looks more darken and real.
Thursday, October 21, 2010


Monday, October 18, 2010

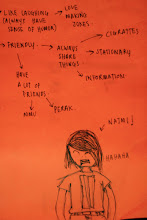
My name is Khairun Najmi b. Mohd Khairani. I originated from Perak. In the small town called Teluk Intan. Currently i'm studying at Multimedia University. Taking the course of Foundation in Creative Multimedia. Now i'm already in trimester 2. The duration of my studies here in foundation is a year. I have 3 trimester that is 1 trimester equal to 4 month of studying. In my trimester 2 now i'm studying PHOTOSHOP for my computer graphics II class. I basically don't know much about the software photoshop. That's why i wants to explore more deeper into this subject by putting myself in to this Multimedia University. My interest at this university begins when i'm at secondary school. Because i see this university is an excellent choice of mine to further my study and broaden my knowledge about multimedia. Also i have deep interest in learning multimedia knowledge. I hope this will be an interesting experience of mine to acknowledge.
Subscribe to:
Posts (Atom)